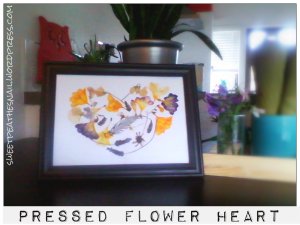
Yes, for early day readers, you may remember I’ve been hinting at a wonderful crafty surprise for my Mother’s birthday – on behalf of her first born grandchild – today’s the day I get to show it off. It took some preparation, but it was worth it!
The original pressed flower heart arrived by Royal Mail at Nanny England’s house just in time for her birthday. Happiest of Birthdays!
I got the idea when Marsh and I were walking in Springtime and he’d pick flowers – usually daisies or dandelions. Sometimes he’d get the flower on a stalk, and sometimes just a fistful of petals.
I thought, if we lived closer, he’d pick flowers for my Mother all the time. He always gives precious things – flowers – rocks – dead flies – to his favourite person at the time. And that would always be Nanny England.
So, everytime we were out, I’d encourage him to pick a flower for his Nanny England. And he did.
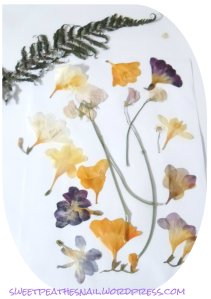
We picked lavender from the Botanic Gardens, sweetpeas from our picket fence, a dandelion from Pahurehure, daisies from Totara Park cow meadows, a tiny silver fern (windfall) from 309 Road in Coromandel and freesias from Nanny Kiwi’s garden.
So, Happy Birthday Nanny England! Here is the keepsake entitled, ‘Flowers my Grandson Picked for Me’.
Isn’t it gorgeous!
Tips on Pressing Flowers without any fancy equipment
I used:
- Heavy plants, heavy books, heavy DVD box-set
- Toilet Paper and regular paper to sandwich the flowers
- Flowers to press
- Cardstock in a colour and size of your choosing
- Paintbrush to apply glue
- Tweezers if your flowers are really fragile (I was ok with fingers, just one casualty)
- PVA glue or mod podge (I used PVA)
- Patience
Place flowers in tissue-paper sandwich. If you’re using a book, also use regular paper on either side of the tissue paper to protect the book-leaves.
It can take as long as six or eight weeks for thick flowers and stems to dry when pressed, so be patient. Ferns by the way need to be pressed as soon as possible after collecting, as they curl and crisp very quickly.
I used a full English dictionary, a sketchbook underneath a plantpot, and a box-set of the Gilmore Girls as my ‘weights’. I used double toilet paper as the press-paper.
Freesias retain their colour. Sweetpeas do not. Daisies and dandelions will lose petals in the kid handling process, but that’s all part of its charm!

How to do it:
Lay out your flowers as you want them and take a photo as a blueprint – so you can refer to it when you’re gluing them down.
Take your time laying them out, the petals are tissue paper thin (sweetpeas), like butterfly wings (freesias).
Using your paintbrush glue one side of the flower, then once it’s on the paper, give it a layer of glue on top. I glued the outside design flowers first, then the inside flowers and ferns.
Wait for it to dry. Voila. Beauty!
I’m going to make myself a toddler-picked art-piece soon too, as we were out and about yesterday and Marshmallow plucked a bright green oak leaf (a Red oak, with a green leaf), but I will post all about it and the subsequent art!


Beautiful ; what the most wonderful gift from you and Marshall to your mum. Another gift to treasure. Very talented and extremely loving and thoughtful xxxx
Thanks Edwina, it was fun too. Havent pressed flowers since misspent youf :) xxxx
This is so pretty!